
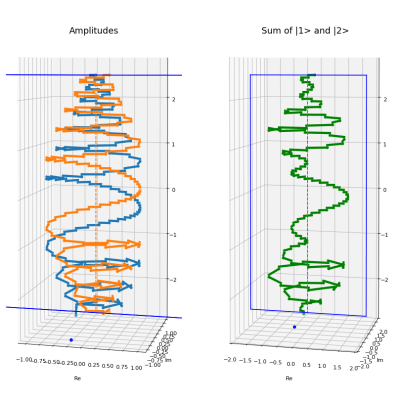
So after playing around with the Feynman Amplitude Spiral and plotting the shape on the computer, I realised I really, really, really wanted my own tangible version of it.
Here’s a few of my attempts. I’ll also include links for anyone that wants to make their own, as well as a jupyter notebook that was used to do all the calculations.
I spent about a month or so trying out various methods for making the spirals. Some are suited to be big classroom models, whereas others are more in the realm of desk art.
3D print:
This is probably the prettiest, but is also not quite as intuitive as the others. After you’ve seen the animation it’s obvious that the horizontal slices are the complex plane, and how the first two spirals are added to create the third spiral, but it’s not necessarily something you’d see without being told.

Also, I think this is just begging to be made into jewellery. The deluxe set would be 2 earrings and a necklace, maybe? What science aficionado wouldn’t want to grace their symposium’s dinner adorned by these?
Big thanks to Erik for printing these models on his resin printer, when my attempts on various FDM printers failed or were too encumbered by support material to come out nicely.
I made the STLs for this by re-implementing my python code in OpenSCAD. Most of the maths functions I needed were already there and seemed to match ordinary C, but I was confused when I couldn’t find anything for complex maths. Then I had to slap myself as I realised that software that has default units of millimetres is unlikely to understand the idea of an imaginary number 🙂 I wonder if I’m the first user to want it? (I should totally have filed a humorous bug report/feature request…)
Of course it was only a 1-line workaround, and the model now works. Although there’s something funny going on with the join at the base? So you might want to double check the STL for errors before getting it printed professionally.
Files here: https://www.thingiverse.com/thing:3212956
Wire sculpture:
This was my first attempt, and I absolutely love it. It’s quite time consuming to make, and a bit delicate afterwards, but it has a lovely 3D feel that the others don’t.
My code gives estimates on the wire length, which was invaluable. Feeding the wire through the frame is arduous, and short lengths are much easier to handle than long ones. Being able to measure ahead of time, and not have to guess and feed an extra two meters of slack through a hole a hundred times makes all the difference

My prototype started with both an X and Y plane as support, but then I realised that the wire was rigid enough to stand with only a single vertical board.
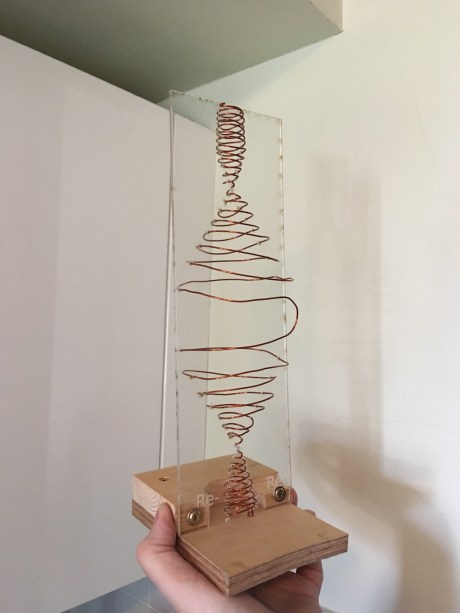
My code calculates the spiral , then for a given material size, plots the X or Y plane intercepts, and directly outputs an SVG for lasercutting:

Files here: https://www.thingiverse.com/thing:3210276
Stack of vectors:
This method is the most intuitive of the lot. The central axis makes the idea of it being a ‘vector’ jump out at you. The layered effect is quite nice, and could even be explained as having a direct physical interpretation relating to detector aperture size.
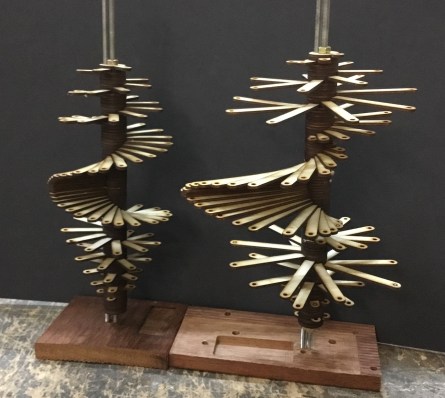
and: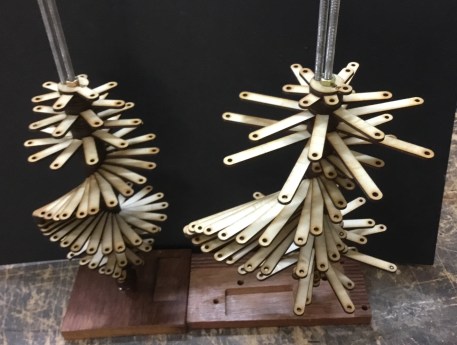
I originally put the holes in the vectors so that a cord or rope could be threaded through each. After testing it, though, it seemed to distract attention away from the actual shape, so I took it out again.
Files here: https://www.thingiverse.com/thing:3212921
Stack of holes:

This one looks pretty, but was the most time consuming to make. Each piece had to be laser cut, then peeled, cleaned and painted, then dried in a special rack, and any overflow paint scraped off. Probably 4+ hours all up, but I’m glad I did it.

Painting and scraping the paint in progress
It could totally be turned into a lamp too, but I’ll leave it for now.
The code generates a preview, which was useful for seeing how many layers were required to capture the detail, as well as fine tuning the simulation parameters to find an ‘interesting’ area of the spiral to plot:
When you’re happy with the view, the code generates an SVG file for lasercutting:
Each tile is numbered just in case of accidents. Also, rather than cutting a single hole for the vector location, a slot is cut between the current and next location of the vector at that slice. That way there’s guaranteed to be a continuous path even with a quickly rotating vector, and the spiral is easier to follow with the eye.
Files here: https://www.thingiverse.com/thing:3212918
Also see Part 3: FAQ

Pingback: Plotting Feynman’s Amplitude Spiral after 50 years | Tinkerings