
This is a quick and dirty way to get a whole bunch (up to 17) small stepper motors working off a single arduino, with no extra circuitry whatsoever.
Why would you want to do that? Maybe you want to make a wall display, a clock or some other interactive object, and you can’t afford thousands of dollars for motors, and hundreds of hours spent wiring up boards for ‘proper’ drivers.
(Side note, the back story to this is for a while now I’ve been wanting to make a big-ish display simulating vector fields, and I was scratching my head trying to come up with a way to do it that wasn’t ridiculously expensive. I ended up finding one that was not only cheap, but lazy too!)
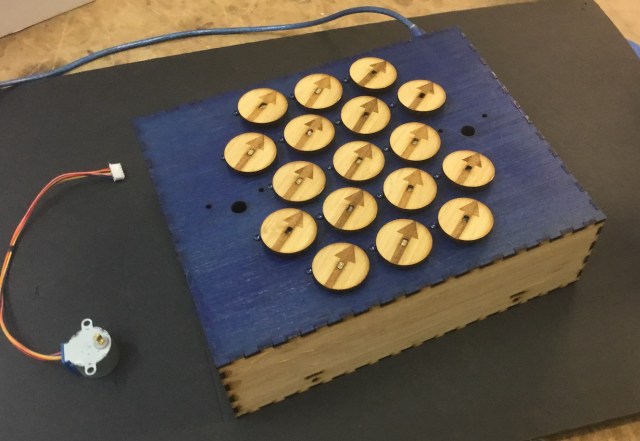
Anyway, here’s the finished display:
The main ingredient is the 28BYJ-48 stepper motors, which is a geared motor which is dirt cheap. They’re mass produced and apparently designed for air conditioning louvres?
Ordinarily when you use a stepper motor you need a dedicated constant-current driver to avoid damage. The essence of this project is how to avoid the cost and complexity of a driver.
The cost of the parts were:
- $3 each for the driver and motor pair , from Little Bird Electronics. (If you really wanted to, you could get them even cheaper in bulk, and also by not including the driver)
- $10 for the arduino, from eBay.
I used 17 motors, so it was $61 AUD all up. Which is ridiculously cheap for something with almost twenty channels of precise motion control.
Here’s what it looks like inside:

A smarter person would have numbered them so they were correct as viewed from the front. Next time, Gadget, next time.
Also, the wiring is also about as simple as you can imagine, I basically just jammed the motor wires into the arduino’s digital pins and slammed the box shut before they could fall out again:

Science
Here’s how to do it yourself. But, before we begin:
If you try this, you might break your arduino.
If you try this, you might break your arduino.
If you try this, you might break your arduino.
And also,
If you try this, you might break your arduino.
Everybody clear?
This approach works*, but relies on several things which might not occur all the time. Don’t assume you can get away with this in other designs.
*Actually, I’ve really no idea if this will work long term, all I can say is that my one has been running for several hours now, and the arduino hasn’t yet caught fire, appeared broken, or visibly lost steps on the motor. Win!
Trick 1: The arduino digital outputs have a non-zero resistance
This is the reason you often see people getting away with plugging LEDs in to the arduino pins directly, without a current limiting resistor.
(For years I thought it the ATMEGA chip had actual current limiting circuitry, but turns out it’s just the internal resistance or something? At any rate, don’t assume you can abuse other chips in the same way. )
I don’t know for sure this is required, but I’ve found in the past the ATMEGA/arduino is way more tolerant than microcontrollers for badly connected loads, so I’ll assume it’s relevant.
Trick 2: We convert the motor from unipolar, to bipolar,
(This has the nice side effect of doubling the resistance of the motor, further reducing it to the point where the arduino chip can drive it without circuitry).
The motor from the factory has a coil arrangement we want to change from this, to this:

We do this by:
- opening up the back cover,
- cutting off the centre tap ( red wire)
- Dremelling out the circuit board to disconnect the two pairs of coils from each other

Trick 3: The 28BYJ-48 stepper motor is crap. And that’s good news for you!
Or, to be more precise, the motor has (before the gearbox) only 32 steps per rev, or 11.25 degree step size.
Why this is relevant is that we want to be able to power down each motor’s coils between movement, so that the arduino is only powering a single motor at a time. But we also want the motor to not lose steps the next time it’s powered up again.
A big 400 step NEMA17 motor (such as you might find in a good 3D printer) has 0.9 degree step size. If you power on and off a big 400 step motor repeatedly, it’ll jiggle slightly. If it jiggles more than 0.45 degrees, then when it’s started it’ll be dragged to the next notch in the rotor, and hence the wrong location. This will happen most when under mechanical load, or the influence of belt tension, etc. So ordinarily, turning motors off translates into lost steps, and poor position accuracy. Hence for a 3D printer, they typically leave the motors powered up, or under a reduced current whenever they need it to hold position correctly.
Because the 28BY-48 motor has a huge 11 degree step size, (and it’s behind a gearbox) it’s really unlikely any mechanical jiggling is going to move it far enough to be a whole step away from where it should be. So the next time it’s powered up, it’ll be pulled back to the exact location it was before!
And that’s it. With code to carefully avoid running more than one motor at once, it can be scaled up to as many motors as you like, and you only need to stop when you run out of arduino pins.
I think am going to enjoy making displays with this technique, and it’s quite satisfying to watch the dials spin around in person.
Files and code here for anyone that wants to make their own:
https://www.thingiverse.com/thing:3544304
Have fun, but don’t blame me if you damage stuff by trying this.
Edit: I’m still playing around, but it seems like you can get loss-free movement of at least 6, 8, 10+ motors at a time. Damn, this works way better than I have any right to expect.

Pingback: Arduino Drives Seventeen Stepper Motors, Carefully | Hackaday
Pingback: Arduino Drives Seventeen Stepper Motors, Carefully - The Best of Everything