
I’ve played with the Galton Board before a couple of times. It’s a lovely demonstration of the ‘Central Limit Theorem’ in statistics. That is, it shows in a really intuitive way how repeated binomial events (like coin flips) average out the number of the results into a bell curve.
In the Galton board, every way from the start to the finish is equally likely. However, since there are lots more ways to reach the middle than there are to reach the ends, the middle results become more likely.
For example, if we flip a coin exactly 4 times, there’s precisely one way to get all heads:
H–H–H–H
But there are six ways to get two heads:
H–H-T-T H-T-H-T H-T-T-H
T-H–H-T T-H-T-H T-T-H–H
So if we flip a coin four times, we must expect that getting a total of two heads is six times more likely than getting a total four heads.
I was pretty happy with my previous Galton boards, but I was still itching for a display with a record of the path each string takes. I realised that if I marked each string twice with the binary code for its route, (once as it progresses through the maze, once as it reaches the bottom) then you’d be able to see that all the final points it ends up in have the same number of colours in each.
The question was just how to be able to make it without having to spend crazy amounts of time assembling it. I tried out a couple of construction methods, first craft beads & builder’s twine:
So much threading of string. Make the hurt stop.
Then I actually made a rig to spray paint string with binary patterns through a mask. Note the spacing on the right is larger, to give more room for string to be used up bending through the maze. 
The spray painting worked fairly well, but it wasn’t as easy as I thought to wrangle all the string together once it was done.
I put that aside for a while, until I got playing with Perler Beads for another project. I realised that since those beads are flatter cylinders than the ones I first tried, that I could make a jig to hold them in place that would make the threading much easier:
Binary in motion
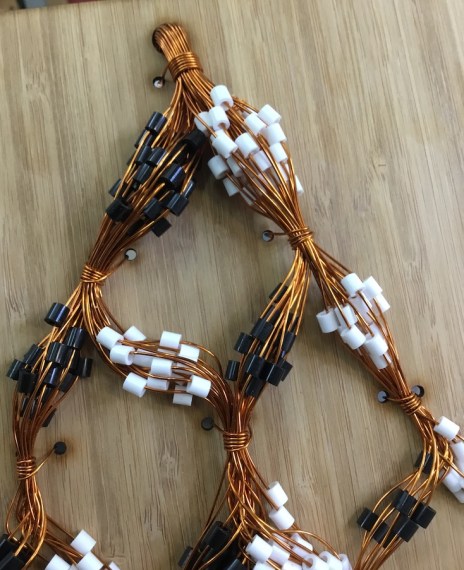
All that remained to make it practical was to find some stiffer thread than builder’s cord. That’s when I remembered we had a huge roll of copper wire at Robots and Dinosaurs that hadn’t been touched in a few years. That made it so much easier to put together, and has a beautiful coppery aesthetic to boot!
Aww yeah.
And here’s a closeup showing that yes, all the bins for a given final state have the same number of white and black beads in each. The sheer ‘heft’ of the middle states is a very nice tangible demonstration of the central limit theorem. 
And the amount of copper at the start compared to the end is a lovely way to demonstrate the flow of probability mass. It starts off almost as thick as a finger, and tapers down to a single strand.
For those that want to make their own, I’ll do a second post shortly with detailed instructions. This method is much improved over my first attempts, but it’s still an evening’s work to put together a board.
Still, I’m pretty darn happy with that, and I can safely say after spending so many hours with beads, the centra limit theorem is something I’m unlikely ever to forget.

Pingback: Making the Braided Galton Board | Tinkerings
Beautiful work!
LikeLike