Quick storage rack for spray paint cans

At Robots and Dinosaurs, we’ve got huge numbers of spray paints, finishes and other bits and pieces that collect in tubs and never get used. Inevitably you can never find the colour you want, and because digging through all the tubs takes time, we’ve accumulated plenty of nearly-empties, duplicates and decades old rusted cyliders of dubious ancestry.

I did a bit of research to see how other people organised spray paints. There are lots of methods out there, but I felt they used too much material, weren’t flexible enough, or took too much time cutting to be easy to make. Eventually though, I found this design here: http://ana-white.com/2015/04/free_plans/spray-paint-storage-featuring-instructables which seemed in the sweet spot of simplicity and practicality, and used it as a starting point.

I measured out the biggest and smallest of our paint collection, and did a bit of playing around shuffling cans on the bench until it ‘felt’ right. The sides, back and shelves are all optimised by what was available in Bunnings, so I could make as few cuts as possible.

The only variable left was the precise angle of the shelves. I made a rough guess, and started from there.

The frame starting to come together (with the cut shelves being stored inside). Because the load isn’t that great, and I wasn’t sure how well if I’d be rebuilding it, the wood is just held with screws. If I were to make it again I’d use screws and glues for extra strength.

Rack under assembly

Test fit of the cans. I put in a couple of shelves with this style, until we realised that if a can fell over it could fall in the gab between the shelf and slide right down the back.

test fit of cans

It’s always painful to go back a step when you’re building something, but if you don’t you’ll generally end up regretting it later. I gritted my teeth, removed the existing shelves and remounted them so it was more stable.

Once I had the new angle and position, I made a pair of template to hold the shelves in place. When the shelves are installed, the templates can slip down flat against the wall and be slid out.

Template for drilling and securing shelves

All finished and with our collection of cans in place. It was also an excuse to go through our full collection. So that’s where the locktite ended up!

Finished spray paint storage rackThere’s obviously a bit of room for improvement. Organising the contents by colour and paint type (oil based, water based, etc). But the beauty of a rack is that it’s now pretty trivial to sort them out. I’ll leave the actual organising for  someone else who’s less tired to do. 🙂

Posted in Uncategorized | 1 Comment

Cleaning up a Sieg X2 CNC mill

Recently a friend of mine Jason was downsizing to move house, and was looking to sell his CNC mill. I couldn’t resist giving it a home, especially after seeing how much effort he’d put into tweaking it over the years.

Sadly the mill was rained on pretty heavily in the recent storms that swept Sydney, and there was a fair bit of rust on various surfaces.

To start with we stripped the head off, and cleaned all the dovetail surfaces. Fine (0000 grade) steel wool, and WD40 was able to remove all the surface rust. After a few hours work we had it cleaned up and aligned again.
IMG_9595

(Not shown is making a wood base, mounting it on the tool chest, doing the wiring, etc).

Reassembled and tramelled (the milling head made vertical), and running a quick test cut:

IMG_9597

Loaded up with a facecutter. Not bad for a first try:
IMG_9598

Any mill needs dozens of parts just to hold milling bits. A bit of lasercut organising later:

IMG_9600

And running under full CNC control. The part is a simple handwheel to add to the stepper motor shafts:IMG_9605

Posted in Uncategorized | Leave a comment

CNC milling log

Milling is a tricky business. There’s lots of variables to tweak; spindle speed (RPM), feed rate, how much depth to remove per pass and more.

As an aide to memory, I made this quick spreadsheet:

CNC spreadsheet screenshot

CNCworklog (DOCx)

CNCworklog (PDF)

This might seem a little obsessive, but when you’re babysitting heavy machinery for 2 hours, anything that stops you making a mistake and having to start over is a good thing.

I just fill it out as I go and throw it in the folder when it’s finished. (I made a folder for the  mill to hold manual, schematics and a hard copy of the software settings in it)

Months from now I can dig back and check for sure if I used a 2 flute cutter or a 4 flute cutter for that job.

Posted in Uncategorized | Leave a comment

Organising lots of small parts easily

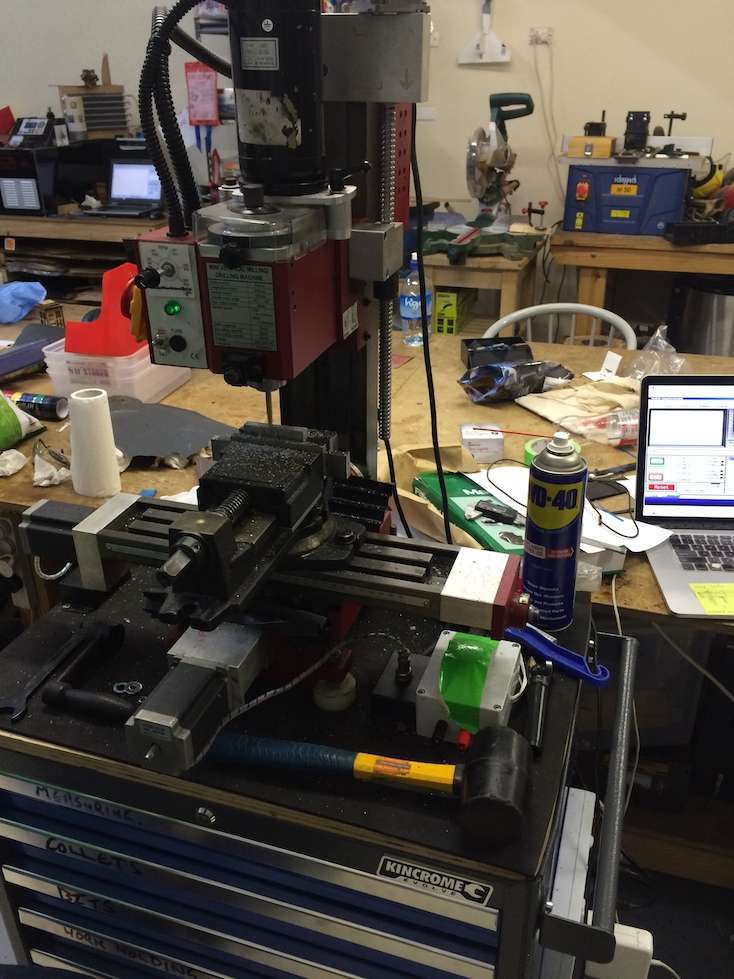
Like a lot of people into making and electronics, I have huge number of parts. I do quite a bit of making at Robots and Dinosaurs, at home, and at occasionally at work, so I’m often travelling with parts to use during the day.

There’s another, very very large reason why I needed to get my organisation sorted, but I’ll cover that in later post.

Before I show what I ended up with, here’s some other strategies I’ve tried previously:

  • Plastic drawer organisers: These are pretty awesome, but they’re also a fairly ‘fragile’ system. Knock it over, and you’ll be in trouble. Plus, you can’t take parts with you easily without transferring them to something else. If I’m asked for help, I like being able to say “No prob. I’ll just grab all my LEDs and meet you in 20 minutes” and figure out the details later. Plus, you have to figure out how much space to allocate to each thing, and it becomes a pain to maintain.
  • Lots of little jars: More secure, portable, but much harder to keep organized. Also comes close to violating Adam’s ‘First order retrieveability’.
  • Plastic tubs: I’m a big fan of using these for project stuff.  All the parts related to a particular project go in the tub. I can grab it on the way out the door to the makerspace, I can pack stuff away, and know it’ll be ready to go next time. For raw components, though, it’s not so fun to dig through dozens of parts to find what you’re after.

Adam Savage is a good source on this, and he’s clearly spent a lot of time looking for good systems. If you haven’t seen it, check  out his toolboxes and the a principle called ‘First Order Retrieveability. You shouldn’t have to move one thing to get to another.

The goal:

So, after chewing on organisation strategies for a couple of days, here’s what I came up with as a wishlist of features:

  • First order retrieveability: For parts this is tricker than tools, since you’re probably going to have to open a box at some point. But it should be as easily as possible to look at what you’ve got, and get at your stuff. If I’m working on a project I’ll often pull out some boxes and spend a few minutes staring at, say, a bunch of switches and coloured lamps to try figure out an aesthetic that fits the project well. Make it easy to graze from your parts collection. You’ve worked hard to collect all those parts, you don’t want to realise weeks later you should have used that better widget, but it was over in another box you’d forgotten about. A good salad bar allows you to focus on the decision, not where you have to stand to see the food (all right, I’ll stop the metaphors now!)
  • Must be easily extensible. No fixed drawers, locations, sizes. I don’t want to have to decide now the maximum of each type of part I’ll ever have for the rest of my life. If I’m donated parts (happens fairly frequently) I don’t want to turn things away because I’ve run out of little drawers on this side and it’d just ruin the aesthetic to put them somewhere else…
  • Must be portable. Have to be able to at least grab a medium sized box/tub/etc and throw it in the car for a day’s hacking. Too large a ‘granularity’ is better than too small. Taking all the LEDs in a box is much easier than having to fish out individual LEDs, and then take the time to return them to their precise previous locations at the end of the day.
  • Must be cheap(ish). No thousand dollar racks of custom fitted professional storage systems whose designers won style awards. I’m sure they’re lovely, but I try to do things that people just starting out in making can copy. Nothing says ‘barrier to entry’ like a big price tag.
  • Must be invertable. Accidentally turning a box/tub/etc upside down, or tilting it when you’re carrying it is just going to happen. Having thousands of screws skitter across the floor, or cross-pollenate into other compartments isn’t acceptable.

With that in mind, here’s what I built in the last week. I was heavily inspired by Adam Savage’s parts rack, but I didn’t want to spend $3000+ on the Sortimo rack and cases.

The boxes:

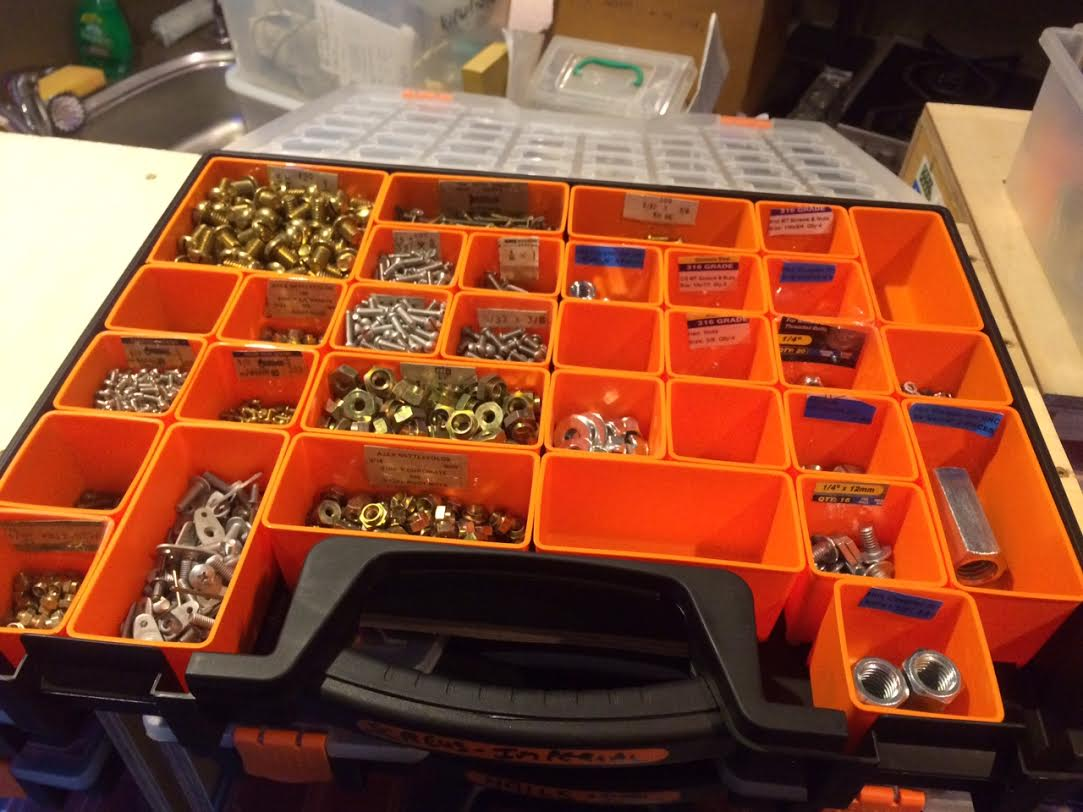
I got a bunch of Tactix boxes from Bunnings for $12 ea. We use them in the makerspace for storing M3/M4/M5 screws and bolts, and they’re brilliant. The lids indent and grip the interior tubs to stop sliding, and when it’s closed you don’t get ‘cross pollination’ between compartments if you happen to invert the case. (I’m sure the proper Sortimo ones are better, but at $~60 a case it’s too rich for my blood. ) tactix box

(Photo stolen from Bunnings, but hey, I like your stuff, ok?)

Also handy is being able to pull out a single tub from the case and take them to the bench while you’re working. If your collection grows, reorganising is just a matter of lifting and shuffling whole tubs around (Compare this to fixed ‘tackle boxes’, where reorganizing compartments can mean using tweezers to fish hundreds of tiny fittings out).

Another good trick I found is to cut the labels off packs and tape it to the drawer. Saves trying to identify the difference between a 12mm and 15mm screw by eyesight when you’re in a hurry, and when you run out you just stick the empty box in your bag and grab more next time you go past the hardware store.
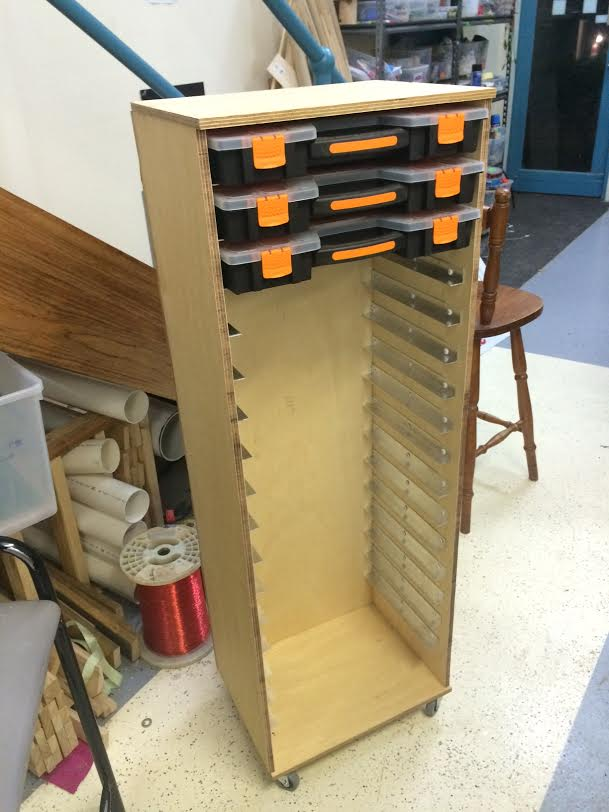
Bolts in the drawer

The Rack:

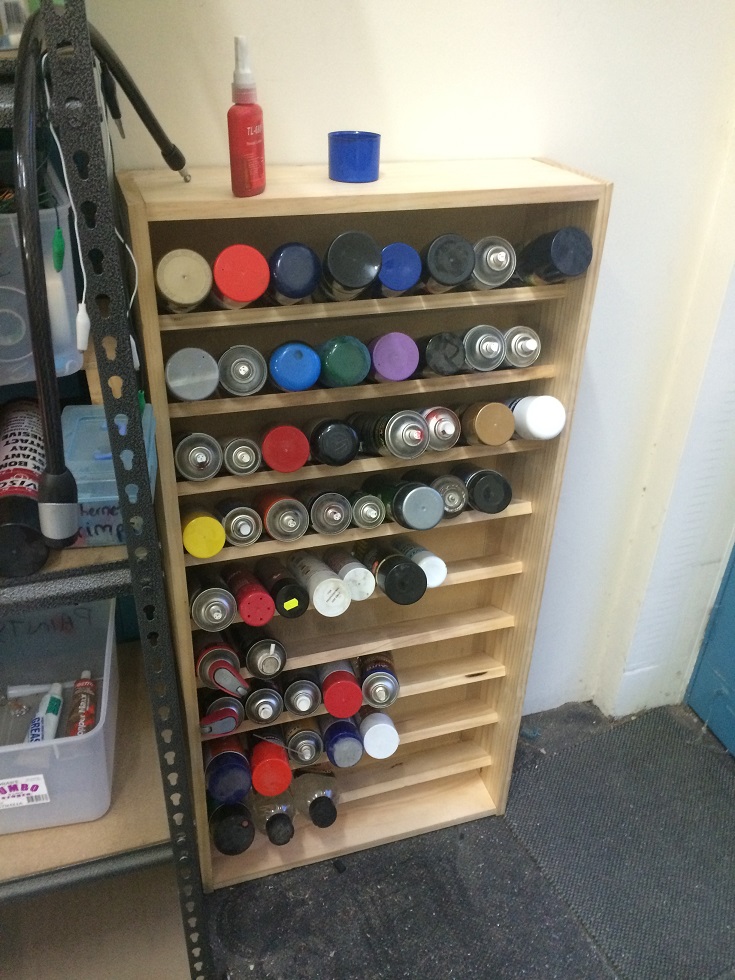
The trays are awesome, I just needed a way to keep them organized. I wanted something simple, easy to transport inside the house, and as dense a storage as possible.

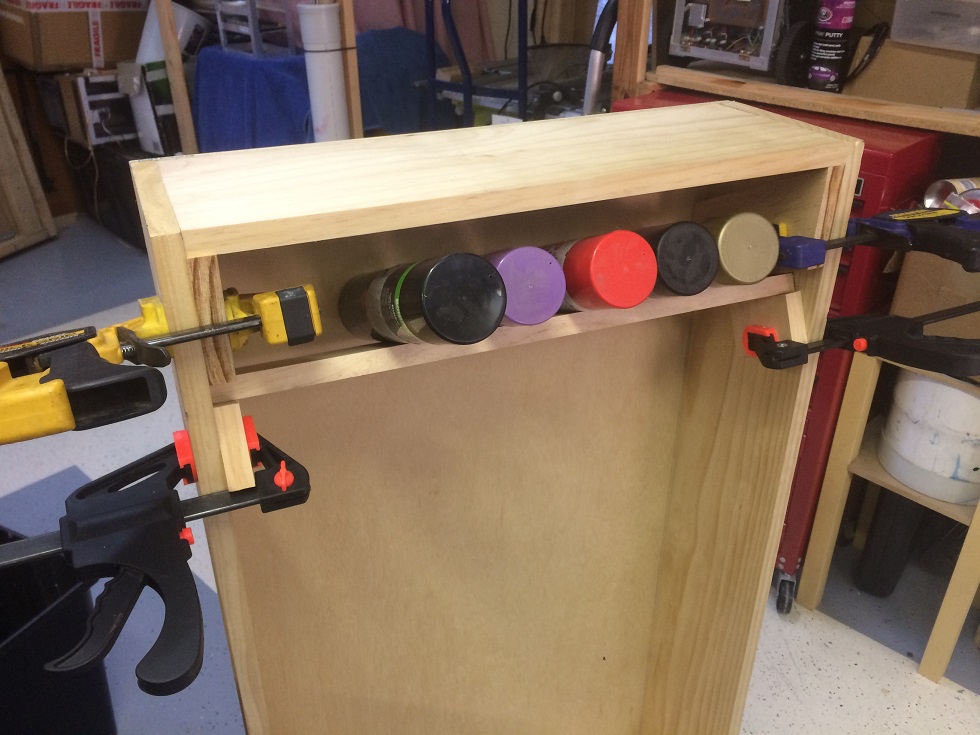
Here’s a pic of the just assembled rack, starting to test the fit:

checking th 
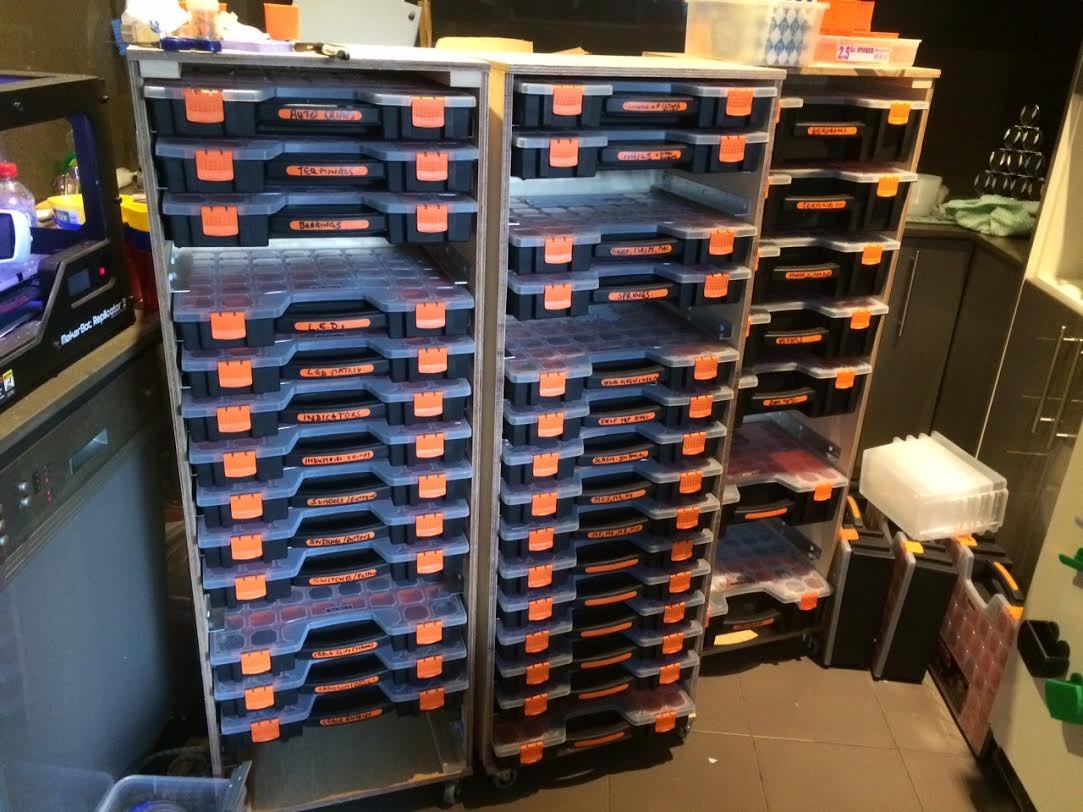
and starting to get filled with cases. (Yes, my kitchen is messy, I was sorting 10 times my bodyweight in parts…)

3 racks in place

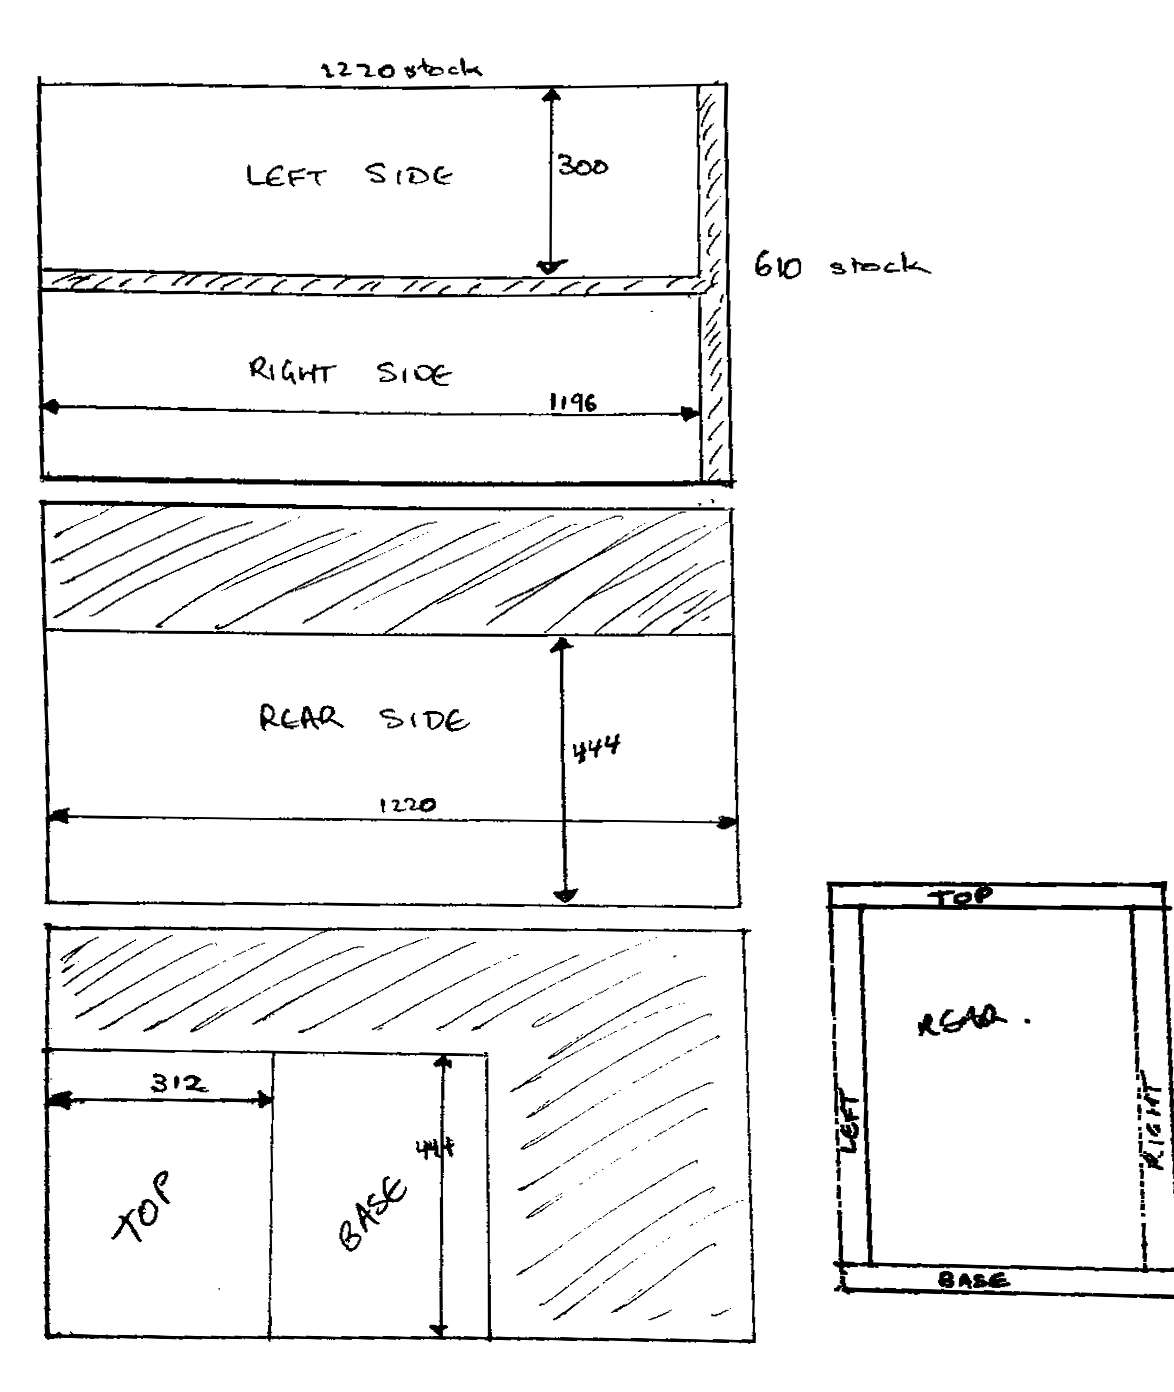
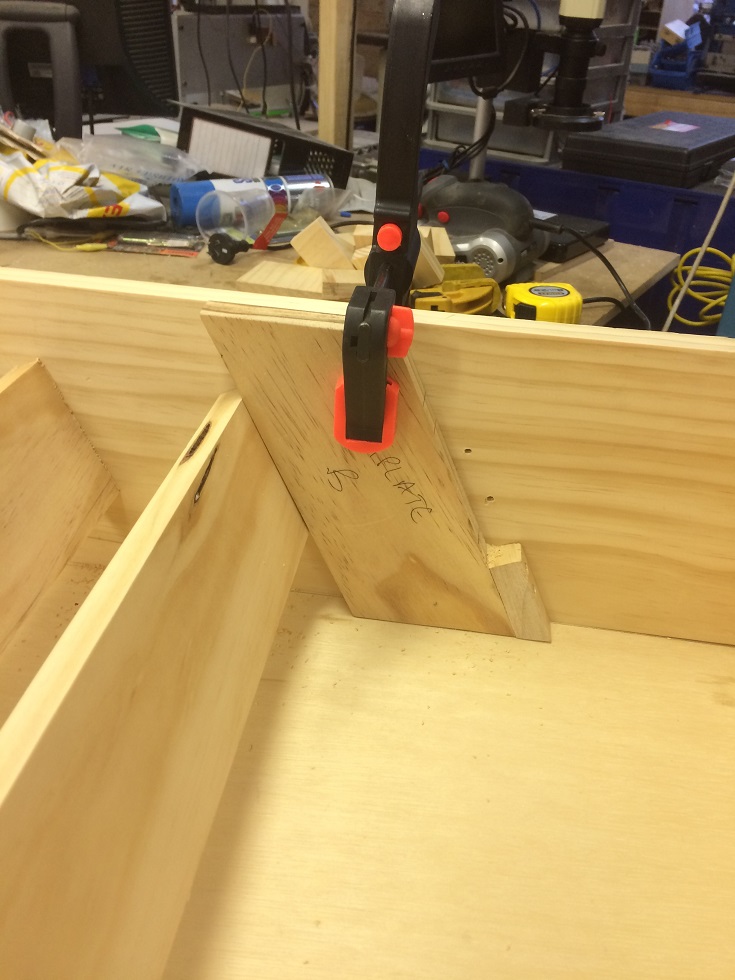
When it’s in place the wood top will be kept bare, so that you have a surface to rest cases on while you’re fishing around for parts. Here’s a quick sketch of the plans if anyone wants to make their own. It uses three sheets of 1220x610x12mm marine plywood, and makes a minimal number of cuts. 270mm x 25×25 ‘L’ extrusion is used for the rails, and is spaced every 70mm vertically for the smaller boxes. Some wheels on the bottom give portability. Wood layout and sizes 
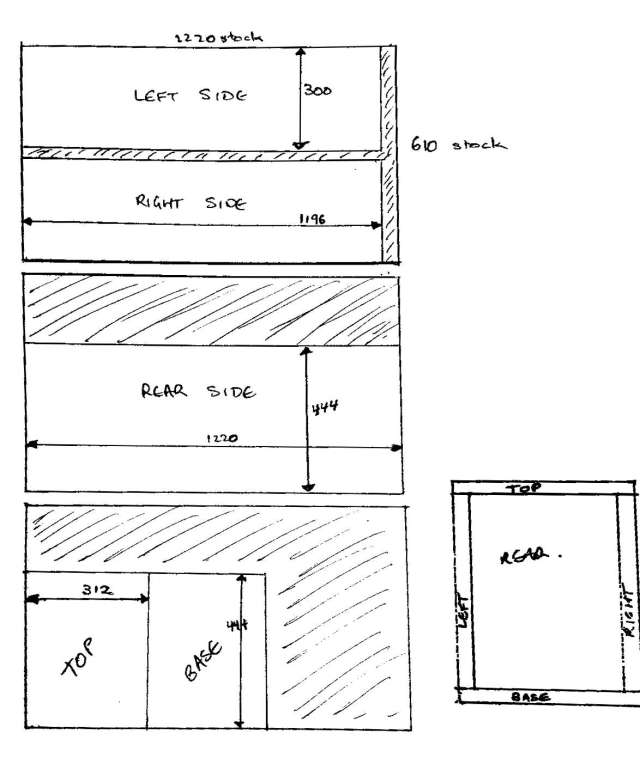
Here’s the price breakdown per rack:

Plywood  $   88.14
Castors  $   18.76
Aluminium extrusion  $   55.20
Screws  $   12.90
Boxes  $ 179.85
Total  $ 354.85

Not too bad, all things considered, and it should suit me for years to come.

Things still on the to-do list:

  • Add better labelling, so you can read contents at a distance. Pretty sure the sticky labels from my label printer will wrap nicely on the handles here. Make the labels so categories are obvious e.g: ‘Screws – Self Tapping‘ and your brain can group them easily without thinking.
  • Add reminders for unusual parts you want to try. Fairly often I’ll see or hear about a nifty tool or part (Forstener bit, nutserts, etc) I haven’t used before, but seem awesome. After getting some, I typically have to wait for it to come up in a project before I can use it. The danger is by the time it comes up, I’ve forgotten about it and will go back to the old method without thinking. I might add some gold stars or something to various drawers to remind me there’s something I’ve been meaning to try inside.
  • Add some colour coding. All screws one colour, all electronics another colour, etc. You want to be able to know the ‘feel’ of where something belongs without having to think about it consciously.
  • Better rack design that allows mixing of thick and thin boxes. I have a couple of ideas, but they’re a bit labour intensive without a big CNC router. I’d like to be able to mix thicknesses, because then all my parts can be in one spot, rather than having to be have some another rack based on height.
  • Number each box. (Thanks Talsit!) Each box gets a number in permanant maker on the right hand side. (the red flip tabs label well). Makes it extremely easy to put things back in the right place, and if you want to reorder the system a squirt of isopropyl alcohol will remove the marker.
Posted in Uncategorized | 4 Comments

Repairing an antique gamma spectrometer with an arduino

A while ago I got given an old Scalar-Counter unit (Thanks Gordon!). These machines are a real blast from the past:

ST6 scalar counter front panel

This was built far before LEDs were invented, and it uses a nifty vacuum fluorescent (or possibly neon) tube setup to show the results. There’s a high voltage generator inside, as well as a timer, pulse amplification circuitry and some ‘discriminators’ to limit pulses to acceptable levels.

Nowadays if you want to do gamma spectrometery you can get devices quite cheaply that’ll talk to a computer via the sound card, and do the pulse height analysis there. Here’s a pick of my other gamma rig, which I’m planning to document the build on shortly:

gamma spectrometry trolley

Quick test using a banana as a sample and looking for K-40

On the bottom of the trolley is about 100kg of lead and aluminium shielding, and you can just see the red body of the probe sticking out of the white tube. Gamma rays are detected by the probe, amplified by the electronics on the top left, and fed to the computer, where the height and shape of the pulse is analysed, and the energy of the original gamma ray is determined.

The older ST6 does the same job, but can only handle one channel at a time. To make a nice bargraph like the one above, you need a scientist with a pen and paper, and a lot of time.

When I got given the unit, the HV and analyser circuitry worked brilliantly, but the timer wasn’t working. This was a bit of a bummer, as the timer is one thing that makes scalar counters very easy to use. E.g. you can set the unit to count for 10mins and show the number of pulses in that time, or set it for say 10,000 pulses, and have it record the time necessary to count that high.

After pulling it apart and testing some of the circuits, it looked like the problem was a broken crystal.

Normally this wouldn’t be too much of an issue, but I didn’t have a 1.000MHz crystal in my junkbox, and none of the electronics retailers were open on Sunday afternoon. Also, no one seemed to sell a 1Mhz crystal, so I’d have to get a 2Mhz or 4Mhz instead, and make a custom circuit to ‘divide by N’ and create the proper signal. After thinking for a bit, I improvised another solution.

The Arduino Mega has a 16MHz clock, and I wrote some assembler to just toggle a pin off, wait a few cycles, and toggle it on again. 3 wires later:

broken crystal and arduino

Silver box at the top is the broken crystal, being replaced by the arduino on the left

And the counter was back to life.

now counting happily

Now counting happily

Once it was working, I mounted the circuit properly to the case and sealed it up again.

It might seem wasteful to sacrifice a $20 (yay ebay!) microcontroller rather than use the ‘proper’ $2 crystal, but once you factor in the time and effort of getting in the a suitable part and possibly designing a divider circuit, I was happy to pay the convenience tax this time.

Posted in Uncategorized | 2 Comments

Lasercut test tube rack

Just a quick and simple project. I wanted a way to hold test tubes, and while there’s a few designs online already, none quite fit what I wanted. Some didn’t have enough reinforcing on the sides (so they might collapse if something leans on them sideways), and others had staggered rows which I thought made it too hard to see the contents.

After a few rounds of cutting this is what I ended up with:

test tube rack

Files are here:

http://www.thingiverse.com/thing:714239

Posted in Uncategorized | Tagged | Leave a comment

A cybernetic jar – Using Kipp’s apparatus with diet coke & mentos

I had a rather nice find today. Picked up a glass Kipp’s generator (from the always enjoyable Professor Plum’s for the modest price of $75.)

Although I’m sure this one is a modern replica, the idea of a Kipps generator is really from another era. Before you could just buy a cylinder of gas off-the-shelf to experiment with, you’d have to produce it yourself.

Moreover, if you’re wanting to react two chemicals together to generate some gas, exactly how much of each should you mix? And how do you store it until it’s ready for use?

This is a problem straight out of control theory, or as it’s sometimes known, cybernetics. In the same way as it’s important to have a automatic feedback loop (such as a governor) in your steam engine, controlling the rate of gas production is extremely important if you’re, say, making hydrogen gas in a lab environment.

The way the Kipp’s device solves this is extremely elegant and simple. By separating the liquid and solid reactants, and using air pressure to push the liquid down, the reaction stops. Removing gas causes the liquid to rise, which starts the reaction again.

No explosion hazard, no runaway reactions, it’s all taken care of with some well designed glassware and a single tap.

A standard way to run one of these would be with something like mixing zinc and sulphuric acid to generate hydrogen gas. I didn’t have either to hand, so I started thinking of what I could use to test it that I could get late afternoon on a Sunday. Here’s what I came up with:

IMG_9262

After using up some of the gas via the tap, the liquid level rises enough to cover the mentos:  IMG_9263

which starts up more gas production, until the liquid level is pushed back below the mentos again:

IMG_9264

This takes about minute or two to generate enough gas. I also tried running it while removing gas constantly, and it behaved pretty well.

Now to be fair, this isn’t quite the normal reaction you’d run in a Kipp’s apparatus. The CO2 is just dissolved in the diet coke, rather than actually produced in a chemical reaction, and also if you leave the mentos out completely, you’ll still get some gas generated from the liquid. But seeing the slowness of the diet-coke-plus-mentos reaction compared to the violence it’s famous for makes me appreciate what a cool bit of glassware this is.

Posted in Uncategorized | Leave a comment

Quick build – a ‘Hyper-B’ inspired kinetic sculpture

It’s 9pm at the Sydney Makerspace and I’m just about to head home, when we start looking at kickstarter projects.

After the usual round of terrible and physically impossible projects, we came across the lovely Hyper-B kit:

and decided we had to make one. (Yes, I’ve backed them too. I’d love to see their project go ahead).

A few minutes tinkering with Inkscape to make the lasercut files, 15mins on the laser, and maybe 10 minutes to cut and file down the threaded rod, and pilfering the M3 nut container to use as ‘beads’, and we had all the parts ready. First assembly was pretty quick, but fell apart later in the evening.

I found some better beads at home, and make a quick motorized stand to turn it smoothly:

Beads falling on wires

I’m pretty happy with the result. I might make a proper wood base to hold the motor, and see if I can find some nicer beads to use as well.

Posted in Uncategorized | Tagged , | Leave a comment

Transporting a giant robot — Part 2

After getting it back to Sydney, we had the not insignificant challenge of actually getting it into the Robots and Dinosaurs space.

First thing to do was construct a ramp from 2x4s and spare plywood:

IMG_9033

The cheap block-and-tackle pulley set we got broke after only moving the control box about a meter. We had to adjourn for an hour while I went and bought and electric boat winch: IMG_9035

Moving the robot body was a lot trickier. We turned the palette into a small ‘sled’, and used it to support most of the weight getting it up the stairs: IMG_9039

Another view of the robot hauling: IMG_9040

Around about here we had to change plans slightly: IMG_9043

After some deft manoeuvring we got the robot onto a trolley and into the space. Done! IMG_9058

Huge thanks to Max, Scott, JD and Sascha for helping with the heavy lifting.

Especial thanks to Scott and Chris for running and organising lumber and hardware supplies while we were arriving with the robot.

Posted in Uncategorized | Leave a comment

Transporting a giant robot — Part 1

Recently I picked up an old Fanuc Arcmate SR robot on eBay for very cheap. Only hitch was that it was in Melbourne, about 1000km away.

The seller kindly helped us load it up, and remove the old steel base.

Robot and fork lift

Some straps and tying later: Tied down robot

And copious wrapping in case it started raining (it did):

Wrapped robot

Posted in Uncategorized | Leave a comment